
The World is Running Out of Water. Here's What We Did About It.
A practical solution.

When the World Economic Forum does something, you should probably pay attention. Every year, world leaders and their billionaire ventriloquists meet in Davos, Switzerland, and make plans for the rest of humanity.
They’re the makers of “you’ll own nothing, and you’ll be happy.”
Well, they decided to make 2026 “the year of water.”
Yay.
Back in January, the UN declared a global “water bankruptcy” and started calling for radical solutions to the water crisis. The American West is currently facing its worst drought in more than a thousand years. Areas across the country are going through their worst shortages since the Dust Bowl. It’s hitting Europe, too. Right now, the Danube is so low that WWII shipwrecks are surfacing.
All this includes me. We’re no longer in hypotheticals. As data centers gulp down our water, local officials tell us to take shorter showers.
We decided to stop doomscrolling and do something about it. In fact, my family has spent the last several years trying to come up with a way to make some form of rain harvesting viable out in the American suburbs. I’ve been working on this project all summer, and it’s done. We perfected our setup. If you’ve read previous versions of this post, you’ll want to read this latest version. If nothing else, it’s got a much snazzier breakdown of all the contaminants our lab tested for.
Harvesting rain isn’t nearly as easy as it sounds.
But it’s doable.
Australia gets it
You see, nearly 80 percent of homes in the U.S. use asphalt shingles for roofing material. Compare that to a country like Australia, where they make up less than 5 percent. Most homes down under have metal roofs.
They’re designed to endure the harsher conditions. As such, Australia has normalized rainwater harvesting. Roughly 1 out of 4 homes in Australia has a rainwater tank. In rural areas, they’re a common sight.
Meanwhile…
Americans have defaulted to poisonous asphalt shingle roofs because they’re easier and cheaper to slap on a home. They don’t last nearly as long, and they’re terrible for harvesting rainwater. The standard asphalt shingle roof contains petroleum byproducts and hydrocarbons, volatile organic compounds (VOCs), polycyclic aromatic hydrocarbons (PAHs), heavy metals, and arsenic.
We tried to hire rainwater specialists in the U.S. to help us install a rainwater harvesting system. They declined.
“Don’t bother,” they said.
Because asphalt shingles have become the default, metal roofs cost a lot more to install. That leaves 80 percent of homes with very limited options during a true longterm emergency or a disaster that hits the water supply. You can only store so much water in a home, and it’s not practical. Water takes up a lot of space. It’s heavy. Most homes don’t really have a great place to put a few hundred gallons of water. Tanks and cisterns cost a fortune. Even if you can find a way to get them on the cheap, there’s the whole poisonous chemical problem.
Complicating matters further, most counties and cities won’t let you harvest rain from a shingle roof for regular drinking water while staying connected to the grid. You’re either on the water grid, or you’re off. You can try to live in both worlds, but it’s a dizzying labyrinth of regulations. If you just want to harvest rainwater and use it for emergencies, you’re kinda SOL. You have a toxic roof. You have no infrastructure or culture to work with. You’re on your own.
We found a way.
If you can’t move to Australia
We couldn’t afford to install a metal roof, and we couldn’t afford to move to Australia. So we came up with a plan that works.
We found a way to harvest rain from our poisonous shingle roof and transform it into drinkable water for emergencies. We installed rain barrels. We made a filtration system with a portable pump and hoses. We treated the water with a homemade chlorine product. We sent a sample to a lab that analyzed it for 100+ contaminants, including VOCs, heavy metals, and bacteria. It passed.
This plan isn’t for wannabe survivalists. It’s the real deal. It’s going to take a little work, but it’s doable. It’s cost-effective. We’re going to explain it in detail, step by step, so that it’s simple to replicate.
Let’s get into it:
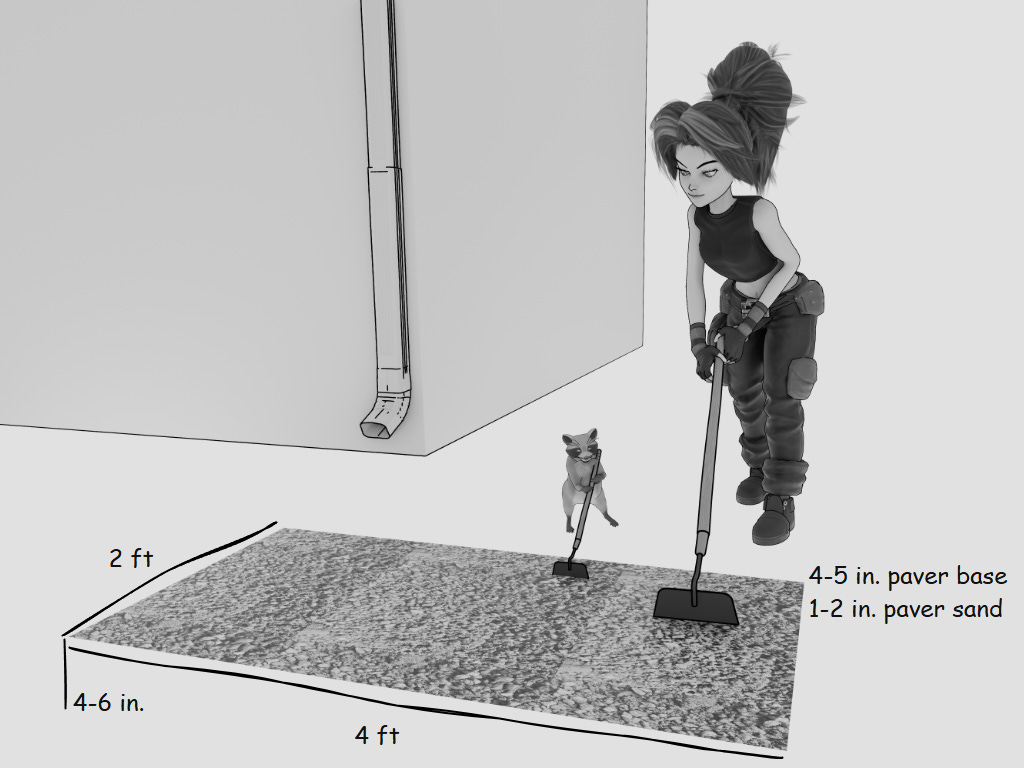
First, dig out your foundation
Add paver base and paver sand. This step helps you level the ground and provide a good substructure for your rain barrels. You want to dig below the topsoil and into the harder clay. If it’s too hard, soak the area with a hose and leave it for 24 hours. You can also use a pickaxe, but don’t swing it overhead like they do in the movies. Use it more like a hoe. Letting a 5 lb mattock drop into the ground will help break it up. Use a level to get the bare dirt as even as possible, but understand that the paver base helps the most. Tamp it down. You can get paver base from any hardware store. You’ll need at least eight bags. Get ten to be safe.
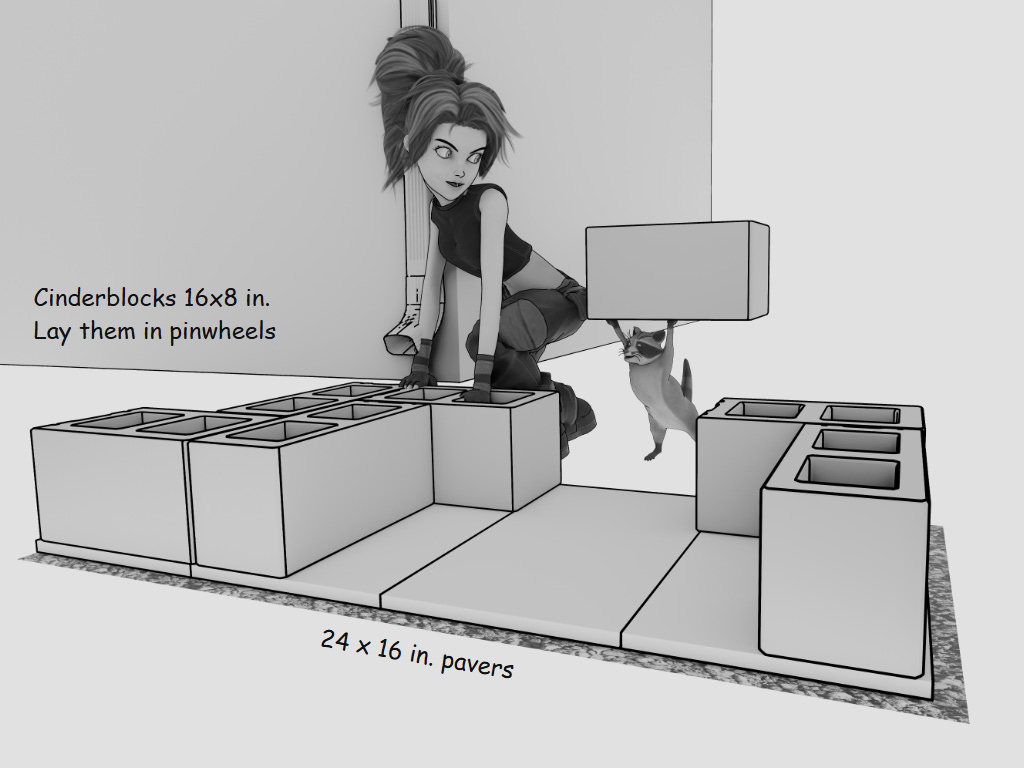
Next, put down your pavers and cinderblocks.
We used 24 x 16 inch pavers for the base. They’re heavy as hell (50 lbs), but they’re worth it to create a large, even footprint. Lay cinderblocks on top. Two cinderblocks with one turned perpendicular match the paver size. The cinderblocks give you the clearance for hooking up hoses, filling up buckets, etc. You’ll put another layer of pavers on top for a smooth surface.
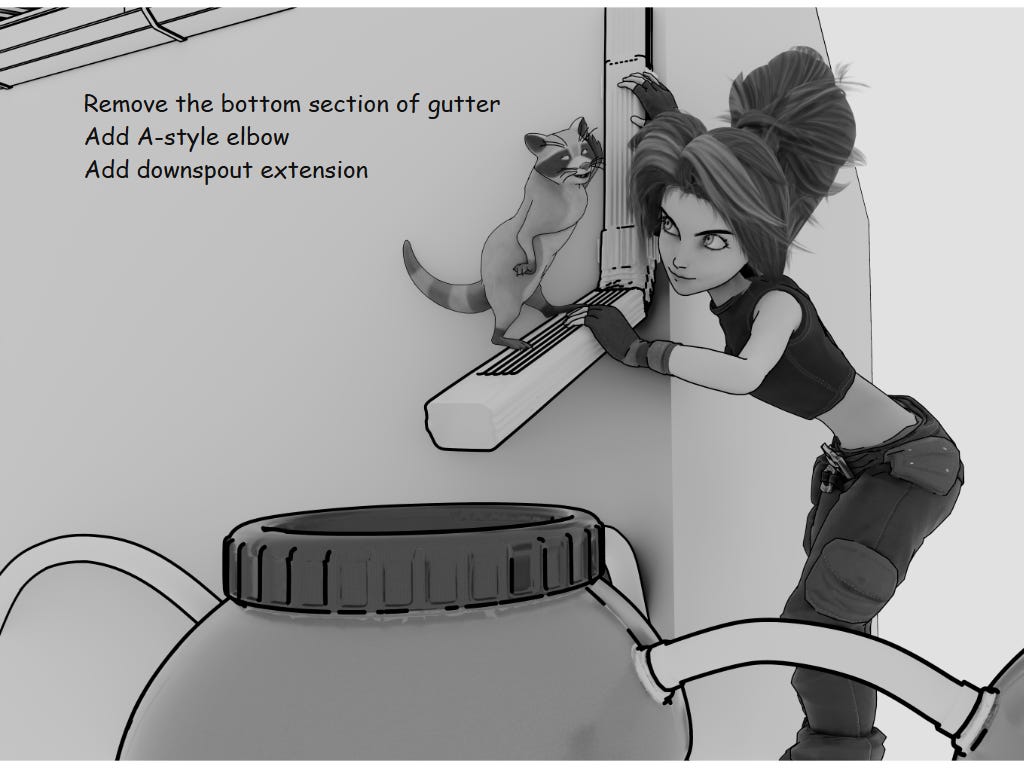
Prepare your gutters
Remove the bottom section of gutter. You’ll probably have to unscrew the downspout straps. You might be able to simply reconfigure your gutter pieces like the image shown above. We placed our barrels 2 feet away from the house to help protect the foundation. We wound up using a hacksaw on a piece of downspout to get the right length. It can be frustrating to cut gutter, but it works. We tried aviation snips, but a hacksaw provided the cleanest cut. If you don’t want to mess with cutting gutter, you can buy pre-cut lengths from places like Gutterworks.
Make sure to measure the gutter heights. You want a few inches of space between the barrel and the gutter exit. Remember that your gutter will be heading down at a 75-degree angle. Don’t use a 90-degree elbow.
Some people skip this step and just buy diverter kits. We couldn’t find a diverter kit with consistent reviews. Biggest complaint: They’re either flimsy, or they don’t collect much rain during light showers. We’re building for extreme droughts, which means a free-flowing gutter. We also skipped the first flush. My full illustrated guide talks about them, but we opted for something simpler.
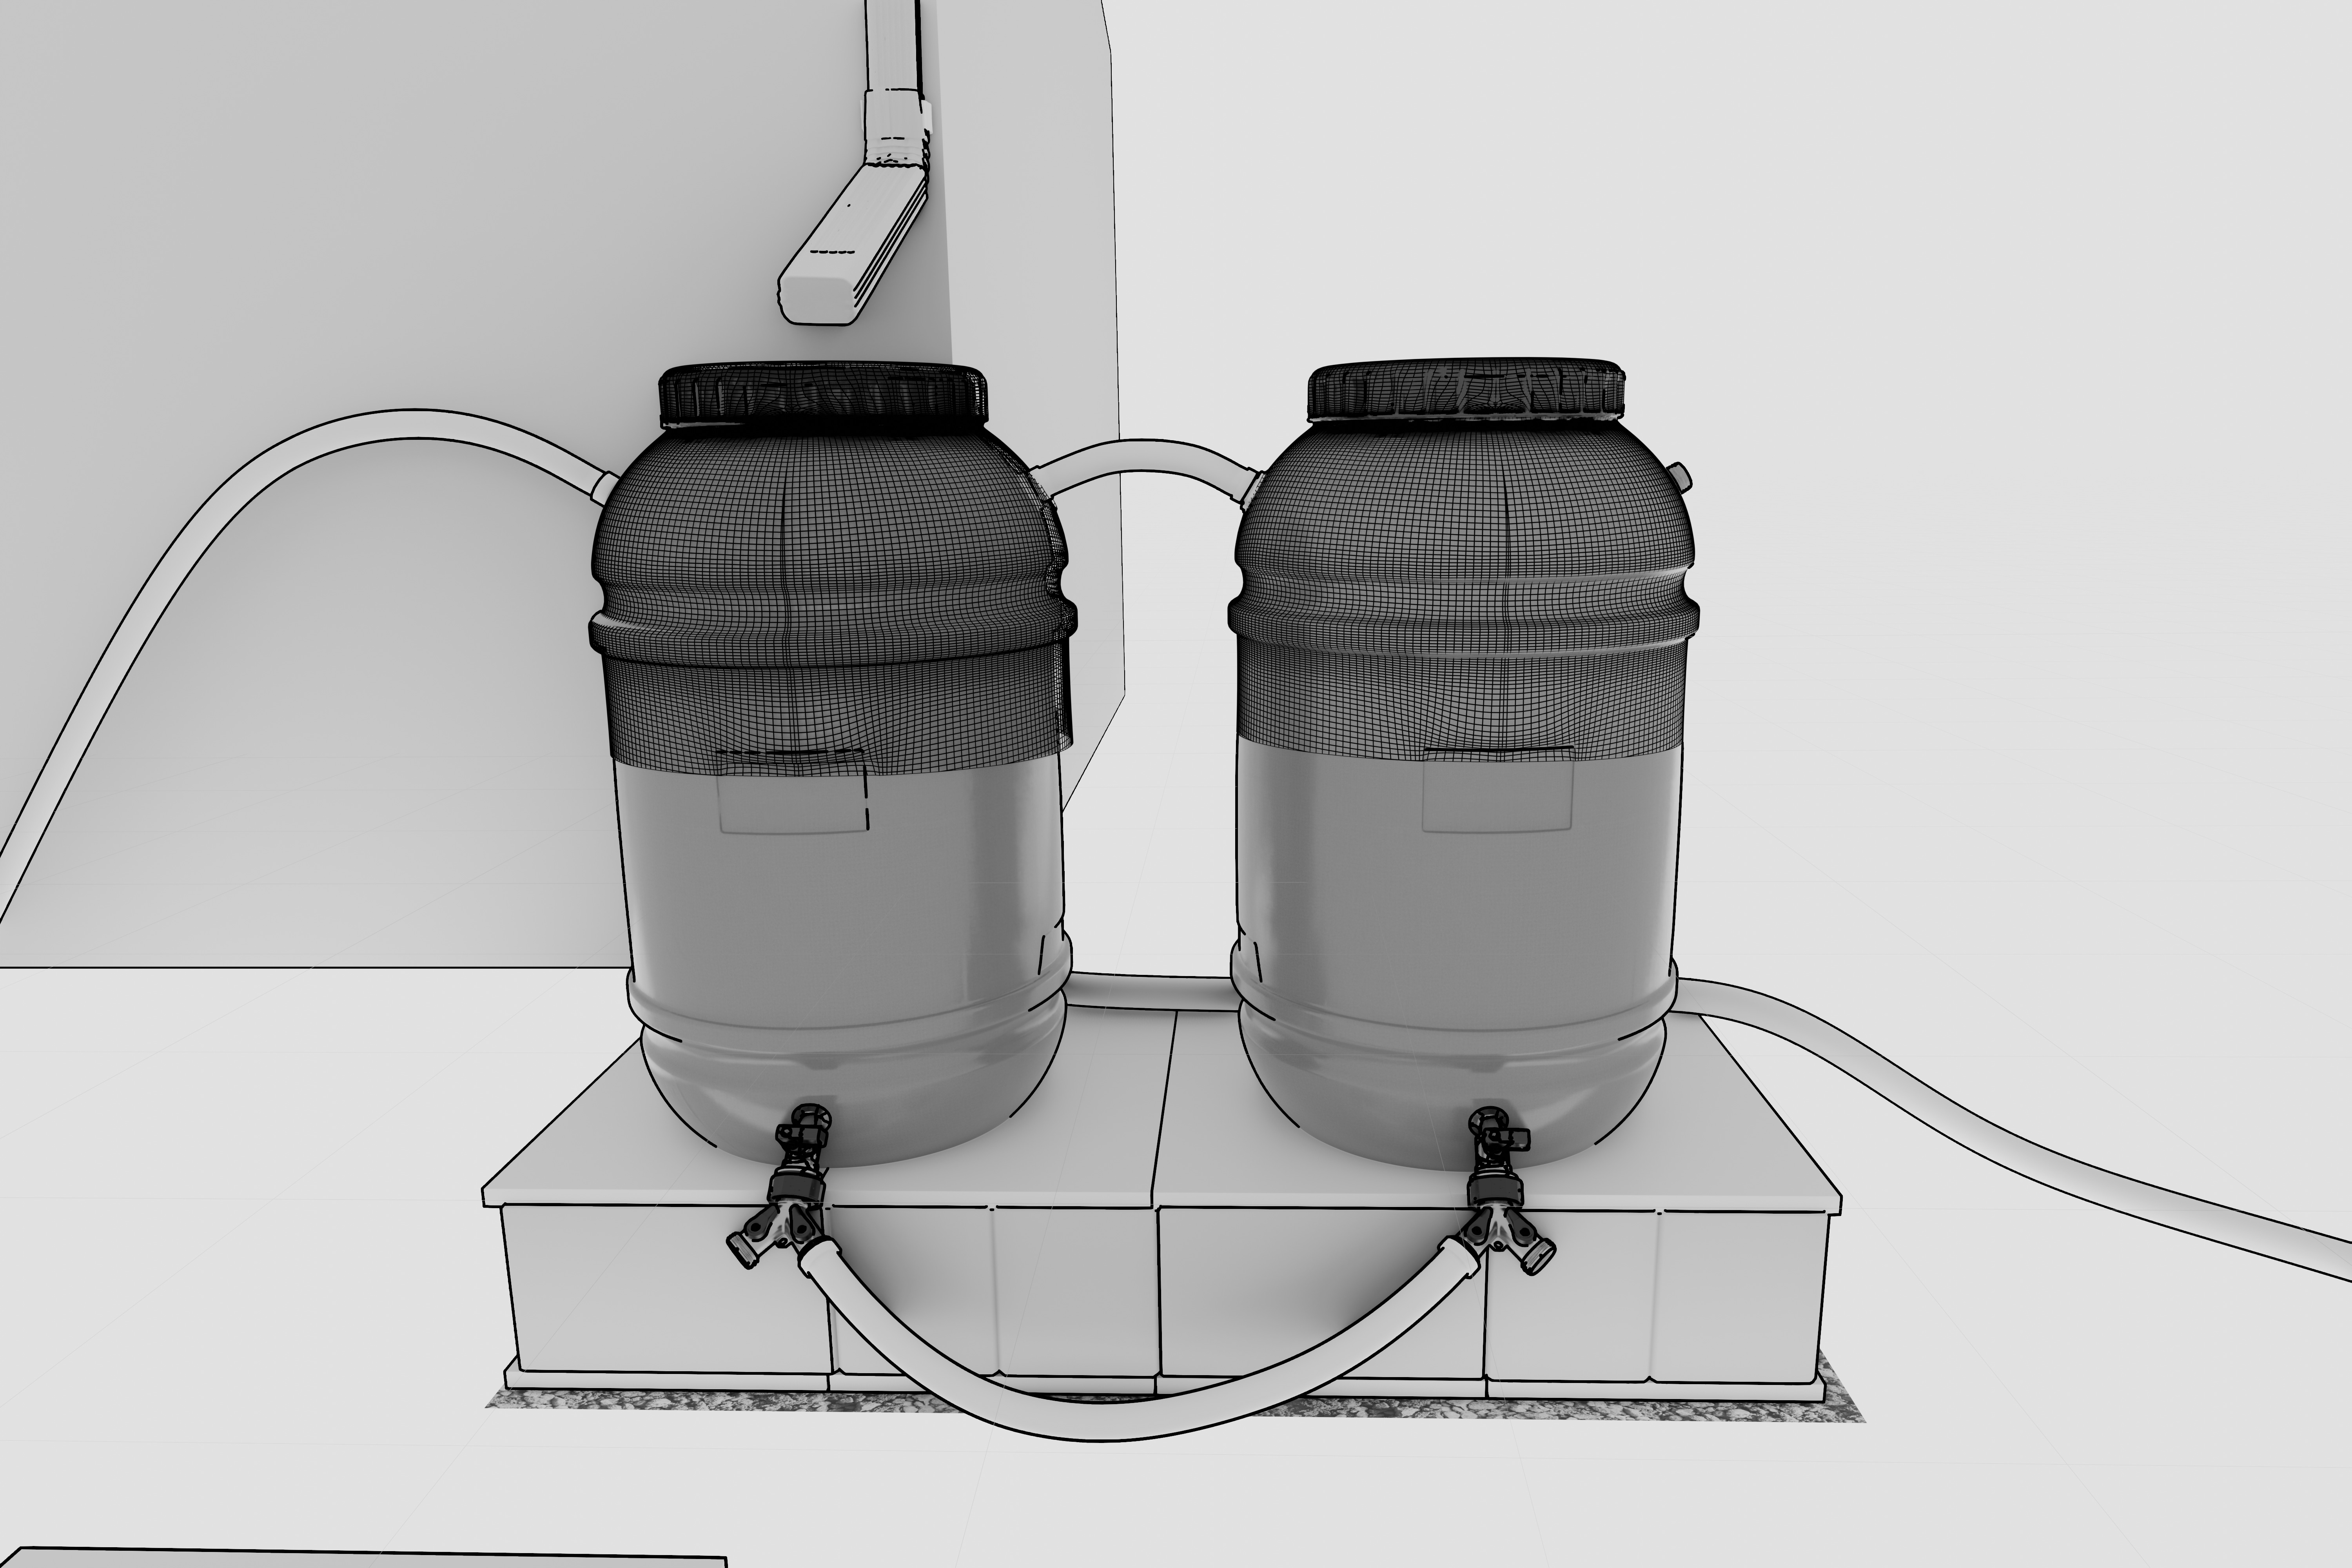
Many rain barrels come with screened holes, but you might want an extra layer of protection. You can buy barrel nets that fit over the entire top part of the barrel. They’re easy to put on. All the debris from the first gutter gush ends up on the net. You just pull it off and shake it.
Get your barrels
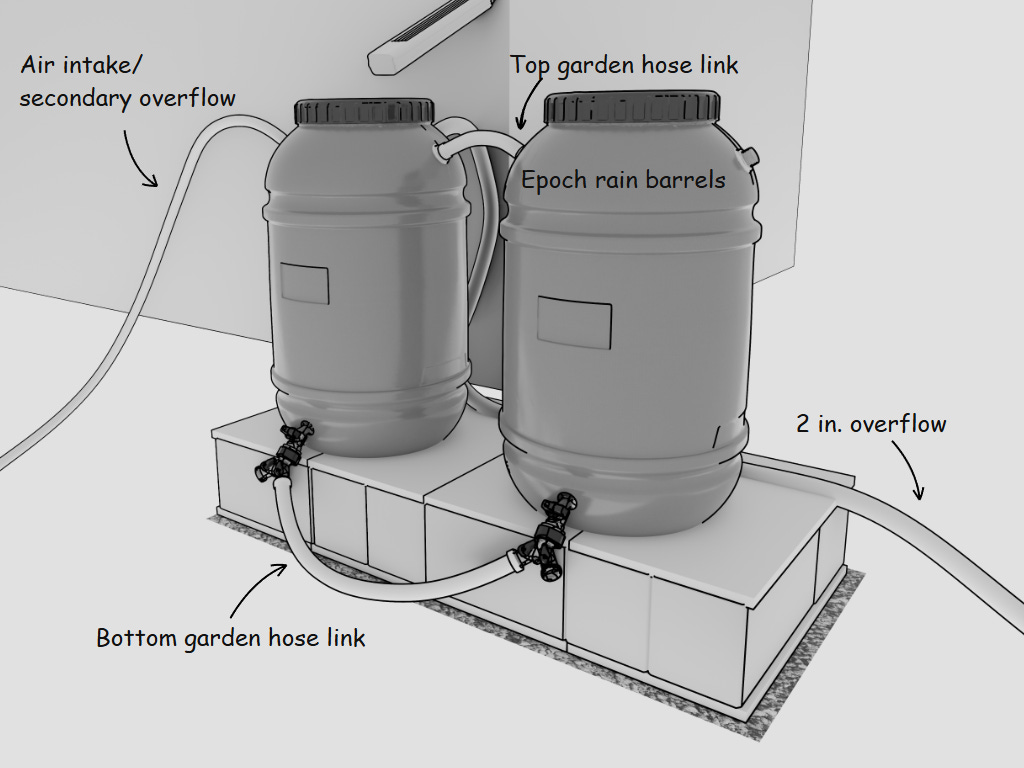
You can buy rain barrels from almost any hardware or big box store now. We decided to go with Epoch. They have a strong reputation. They use upcycled food barrels. Ours arrived clean, with all the parts already installed. We could’ve drilled out the holes ourselves, but it can be a real hassle if you’re also digging a foundation and working on other projects. These are tough barrels that will last a long time, and that’s the goal. They’ll take a beating. Remember, these things will be holding hundreds of pounds of water when they’re full.
You can link the barrels at the top and bottom to ensure they fill at the same time. Just add hose splitters to the faucets. Get a short hose for the top link. You can cut it and then add a female hose repair to the other end. You technically only need one splitter, but two means you can draw water from either barrel.
Add a more serious overflow
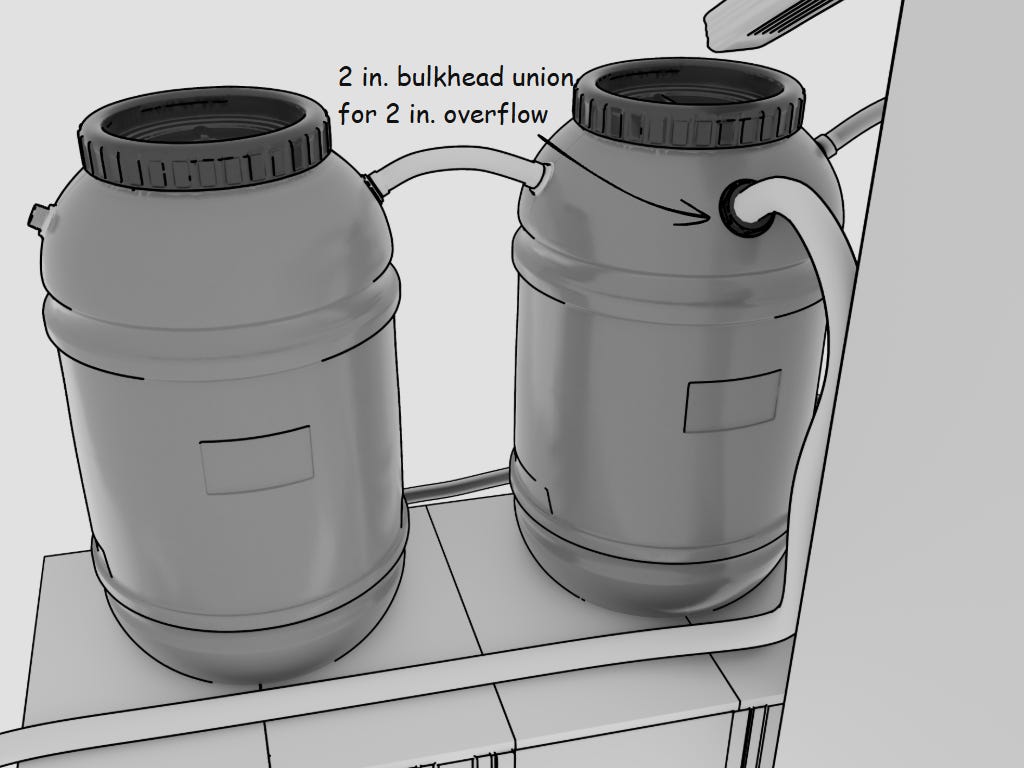
Unfortunately, most preconfigured barrels come with tiny garden hose outlets for the overflow. They’re not going to handle a major storm or a flash flood if you’re using a free-flowing gutter. Companies assume most people will be using a diverter kit. If you’re using a full gutter, then you need a bigger overflow.
We did the math and arrived at a 2-inch hose. Combined with our two-barrel system, it can handle up to 3 or even 3.5 inches of rain per hour. Believe it or not, even during a drought, you can expect flash floods. You don’t want floods spilling rain over your barrels and into the foundation you dug.
It’s not easy to find a 2-inch heavy duty hose, but we finally got one from Gloxco with a male NPT nipple. It’ll fit right into a 2” bulkhead union. For that, we’re drilling a 3-inch hole on the backside, just the first barrel. Yes, you drill a 3-inch hole for a 2-inch bulkhead union. That’s how it works.
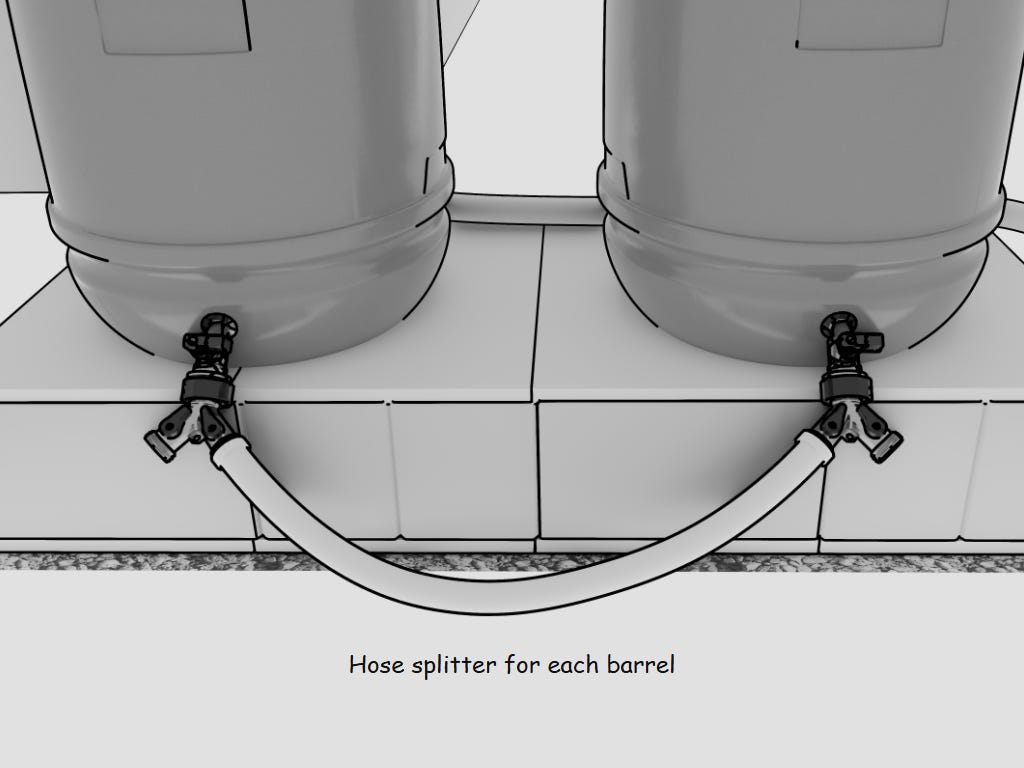
Here’s a closeup shot of the hose splitters. Pretty standard. But if you want a heavy duty one that’s lead-free, try Morvat.
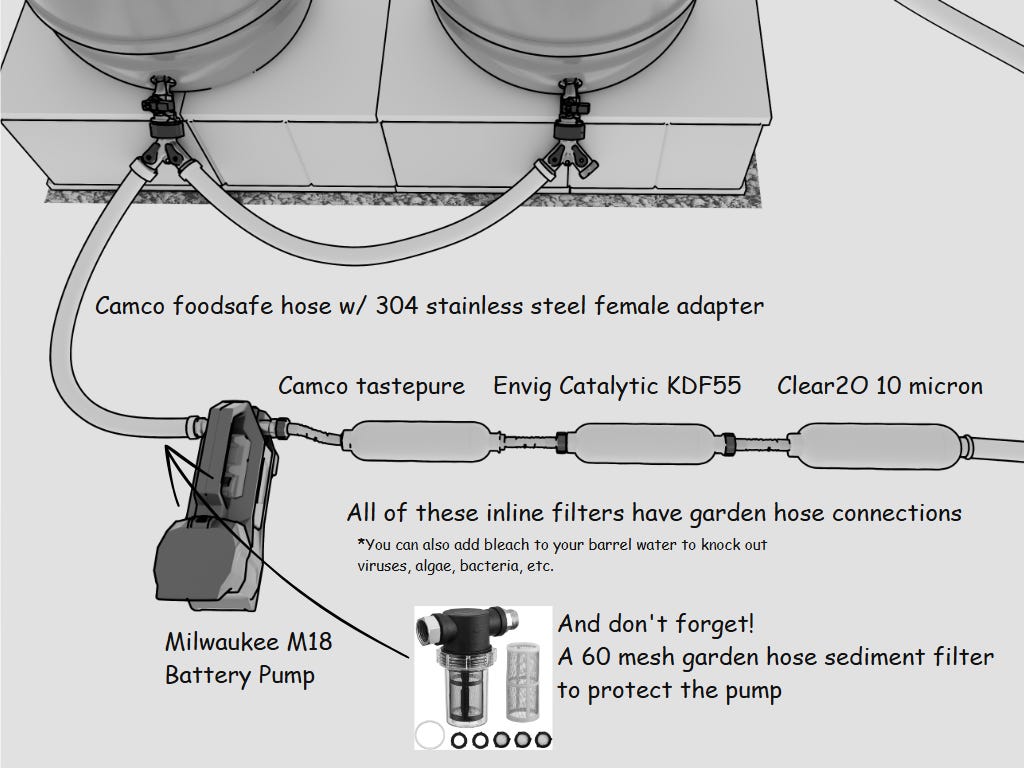
The first filter setup
Now we’re going to walk you through the trial-and-error process for getting the pump and filters set up. That way, you’ll understand it all better.
(It’s called scaffolding.)
The hardest part was coming up with a way to filter the roofwater. Most of the filtration systems we looked at were expensive and impractical on a budget. Then we got the idea to use a battery pump.
It was a gamechanger.
This portable battery pump gave us the pressure and gallons per minute (gpm) needed to push the water through inline hose filters you see in the image above. Just to be crystal clear, no, you can’t rely on gravity to push the water through these filters. You need a heavy-duty pump. Ideally, you need one with a battery you can take out and charge on a solar backup system. It’s a major plus. It makes the system much more resilient during power outages.
First, add a 60-mesh hose filter to the pump intake. This step keeps grit from the barrel water from ruining the pump. The phrase “60 mesh” means 60 openings per inch of screen. You can go as high as 400, but don’t. If the screen is too fine, it can choke pumps and deflect water.
Uxcell and Giex sell reliable brands of garden hose sediment filters.
Next, a Camco TastePure filter (20 micron) acts as a sacrificial first defense. It removes finer sediment. It also strips out some of the VOCs and heavy metals. Its main job is to protect the other filters.
The Envig Catalytic KDF55 uses a stronger type of carbon that strips out a lot more VOCs and heavy metals.
The Clear2O does a final sediment mop-up to catch anything that got through the first two filters, including any carbon particles.
These filters don’t strip out any viruses or bacteria. They do prefiltering for our gravity-fed setup at the end. You can add a little bleach (about 1 ounce) to each full barrel to help knock out those threats early. Be careful. Bleach can interact with roof runoff to create toxic byproducts. You can also use HOCl. It’s safer, more effective, and it won’t ruin your clothes.
The good news:
All of these filters use garden hose thread. They come with garden hose attachments. So does the pump. You don’t have to fuss with adapters.
Simple.
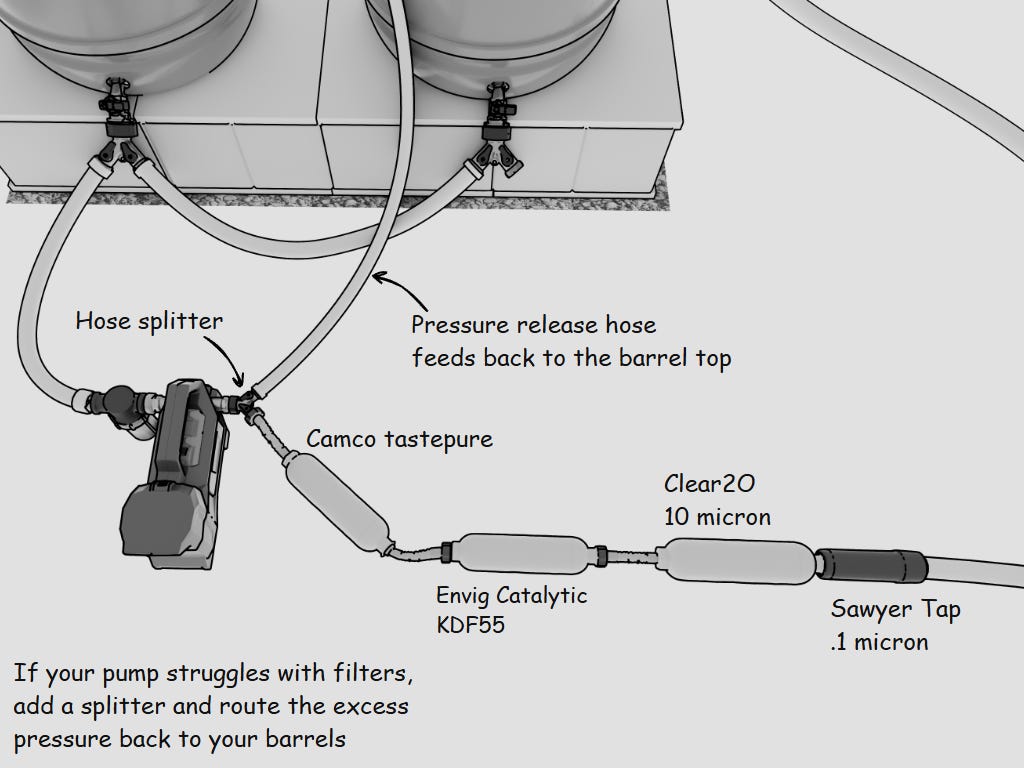
The second filter setup
We improved on the first filter setup in a few ways.
First, we added a Sawyer Tap to the end. It’s a tight little .1 micron filter that also features a garden hose thread for easy attachment. The .1 micron filter blocks 99.99 percent of bacteria and other threats like Giardia and Cryptosporidium. It also stops microplastics and fiberglass dust that can shed from a shingle roof. One of the only things it doesn’t stop: viruses. (For that, we use a gravity system, discussed later.) Even better, this filter costs around $30 or $40, and it doesn’t need replacements. You can clean it by reversing the water flow.
We also added a pressure release hose.
The more filters you add, the more backpressure risk you add to your pump. That can strain the motor and cause damage. We bypassed this problem by adding another Morvat hose splitter on the pump outlet. Route one spigot into your filter lineup. Route the other back to your barrel.
This way, your pump pushes as much water into the filters as they can handle. The excess goes back to your source. That’s especially important if you’re going to use submicron filters.
Problem solved.
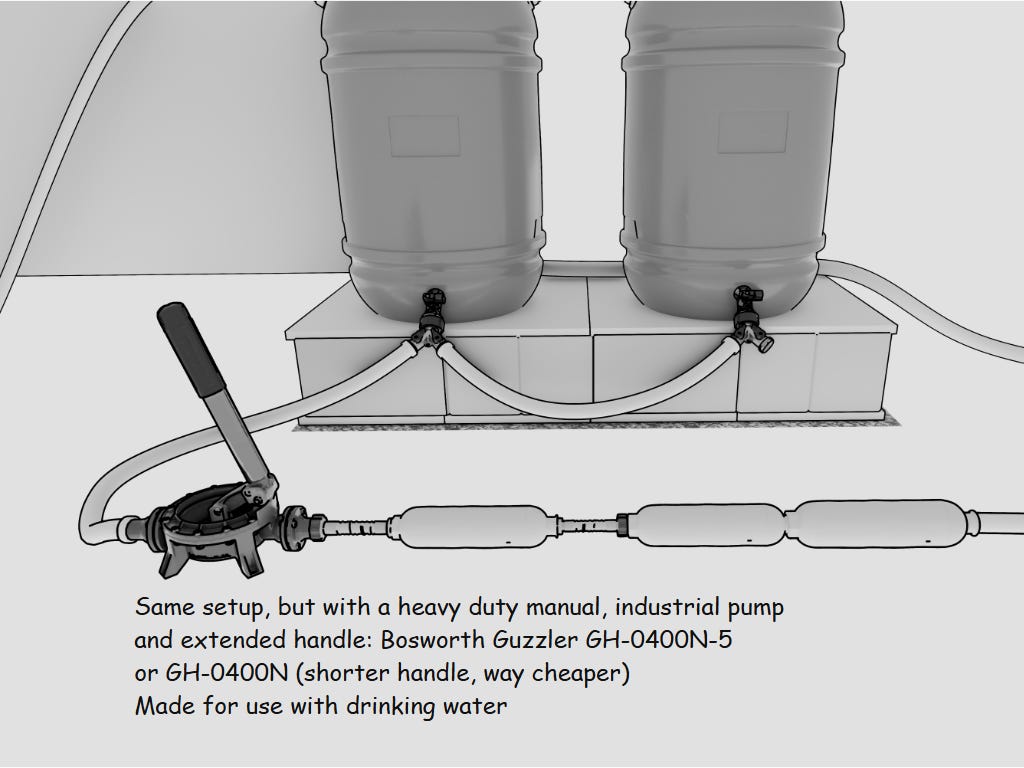
The third setup
Portable electric pumps offer convenience, but you might wind up in an emergency with no power, not even solar panels to charge a battery.
That’s why we got a manual pump.
It took a long time to find something capable of delivering the right pressure to push through 3-4 different inline filters, but we finally landed on the Bosworth Guzzler. There’s a model with a short handle for around a hundred bucks. It’s moderately hard to operate. We shelled out the extra money for the upgraded version with an extended handle, because… who knows? Maybe we’ll get injured. Maybe our kid will wind up needing to run the pump. The upgraded version makes operation way easier. If you order a Guzzler, you can choose garden hose threads for the native ports. With the manual pump, you have a lot more control over the pressure and flow. You’ll still probably want to add a 60-mesh sediment filter to the inlet.
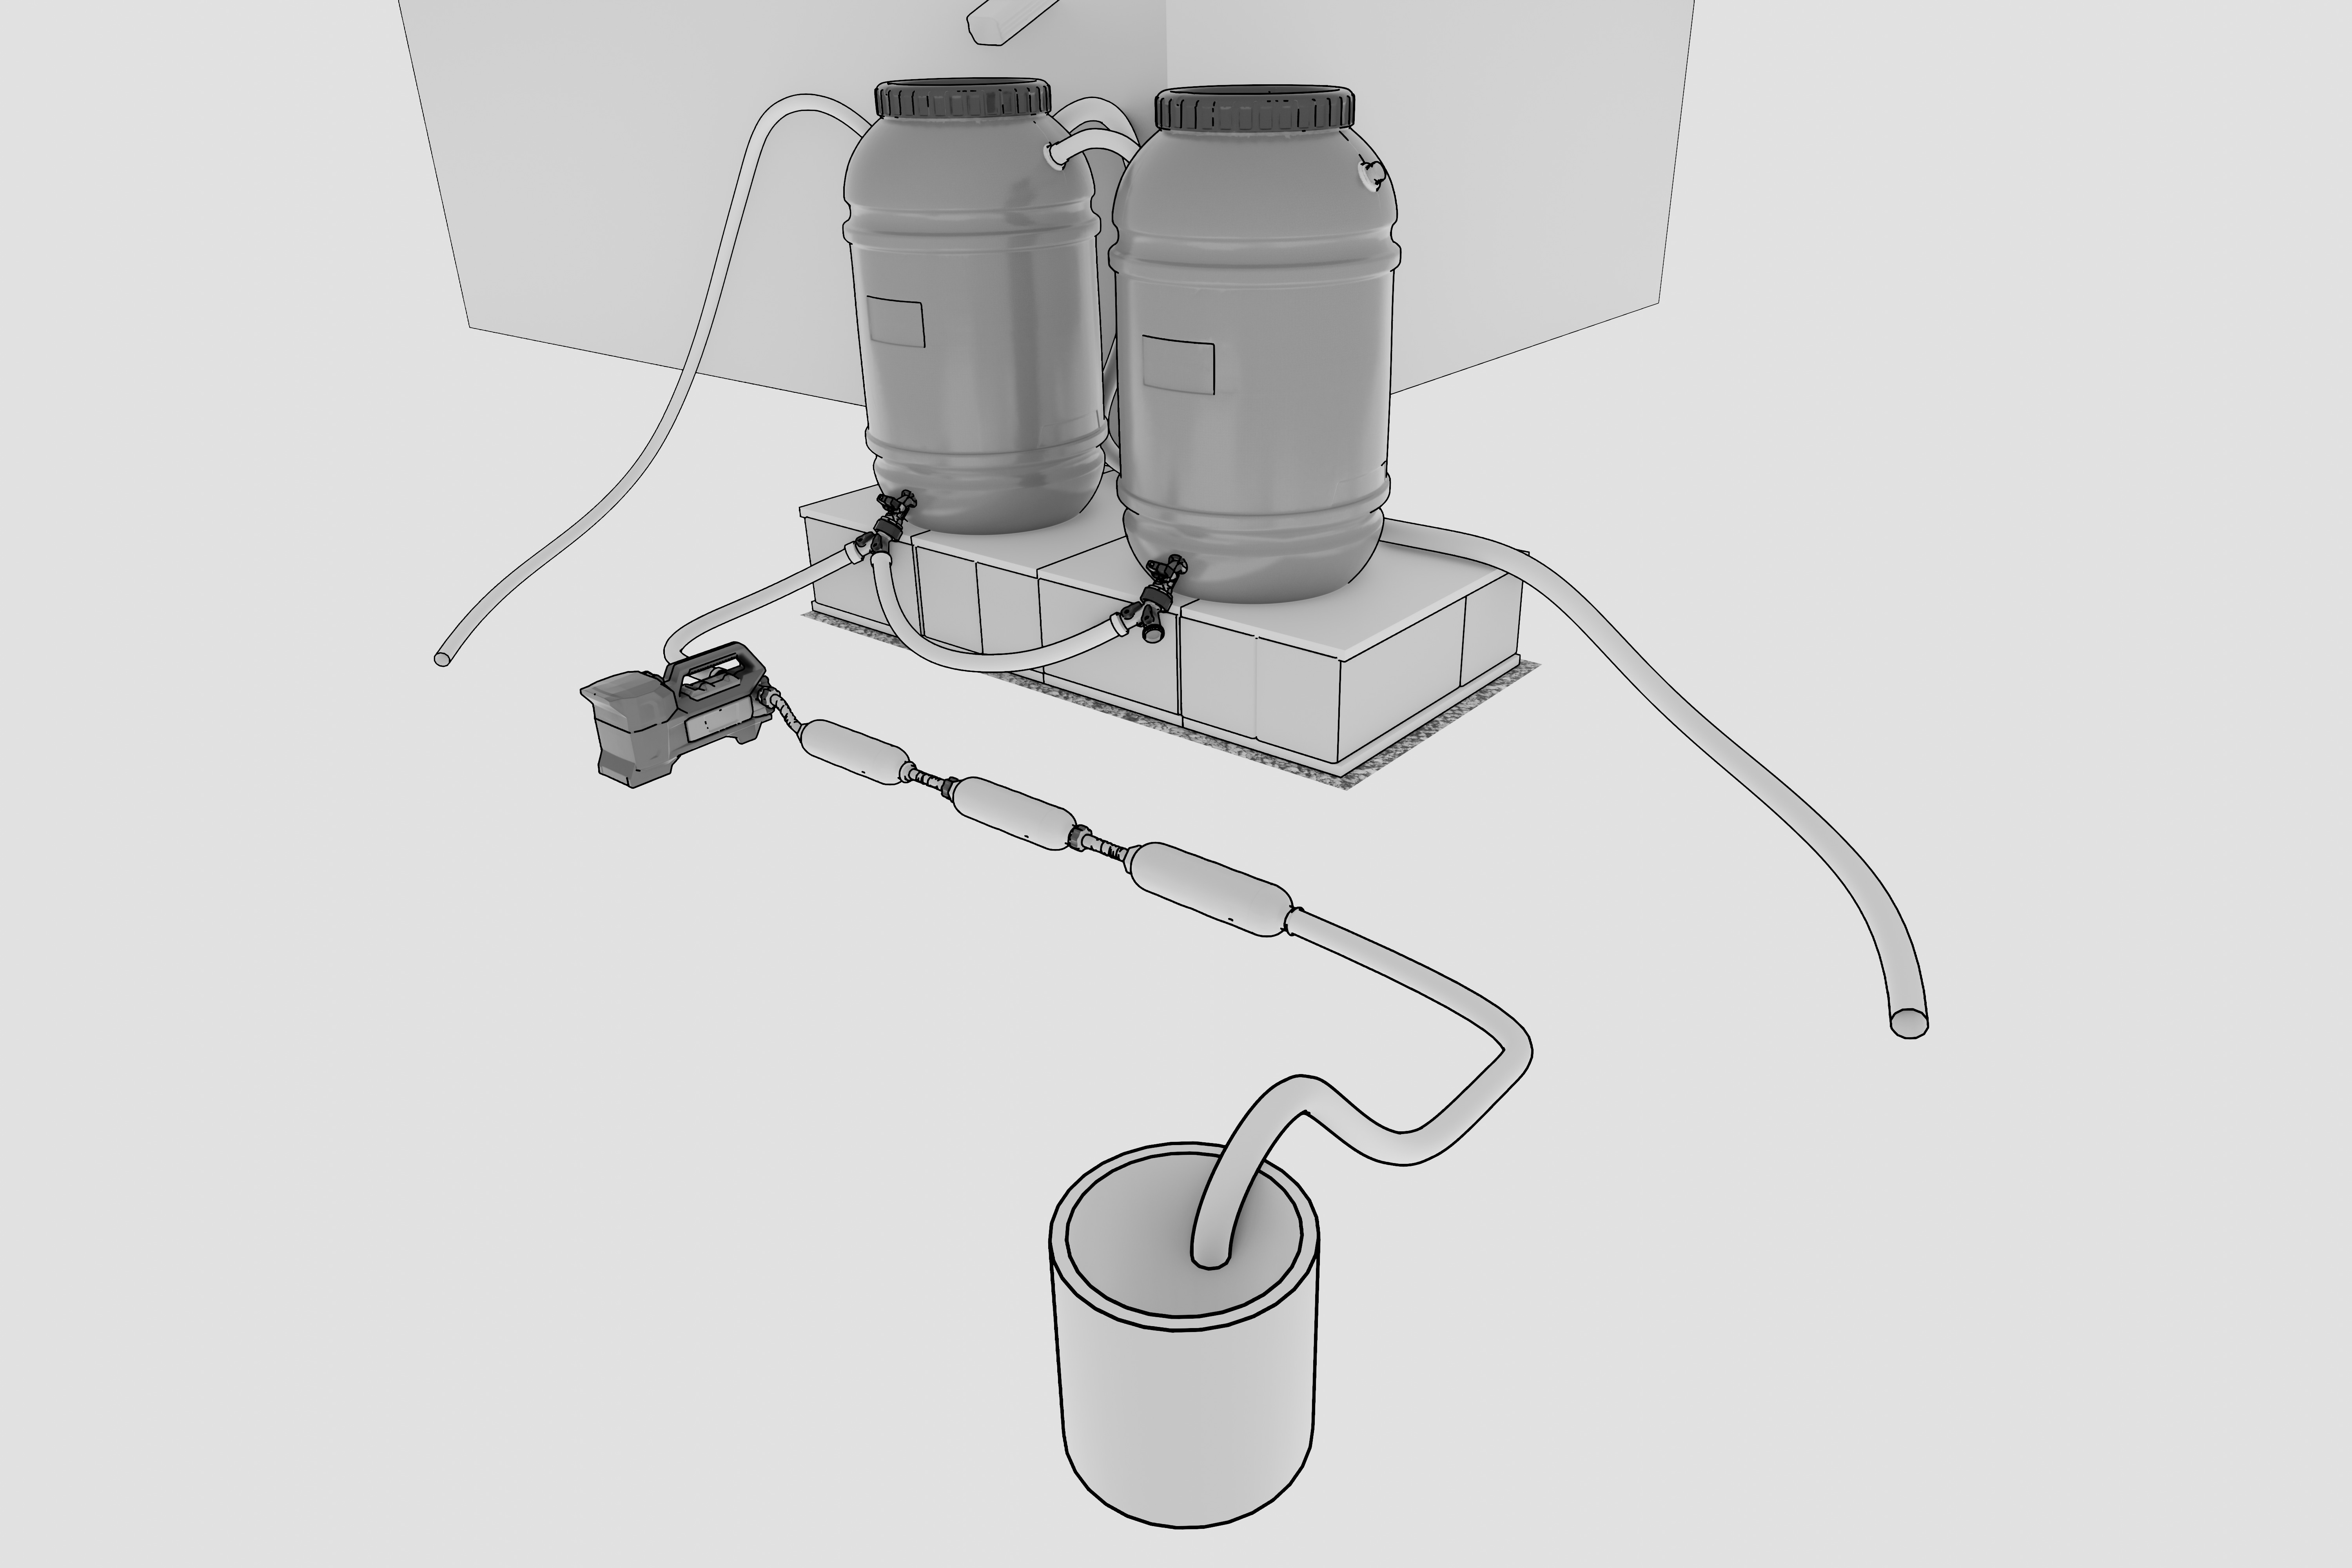
Add your collection tank
The filter line feeds into a bucket. We got 2-gallon and 5-gallon foodsafe buckets from Leaktite. Some days, you’ll want to filter several gallons. Other days, you’ll just want something light. For the hoses, we went with Camco 4-ft premium RV drinking hoses. They’re foodsafe. You don’t want to run standard garden hoses into your pump or your bucket. They can reintroduce contaminants.
On the filter end, if you need any adapters, look for ones made with lead-free brass or 304 steel. That way, you keep it all clean.
If you want something bigger than a 2-gallon bucket, Epoch sells 17-gallon mini rain barrels. We got one. The plan: Fill it up once a week by running the pump. Use the filtered water for growing food. We can also collect drinking water from it during an emergency if we need to do that.
The fourth & final setup
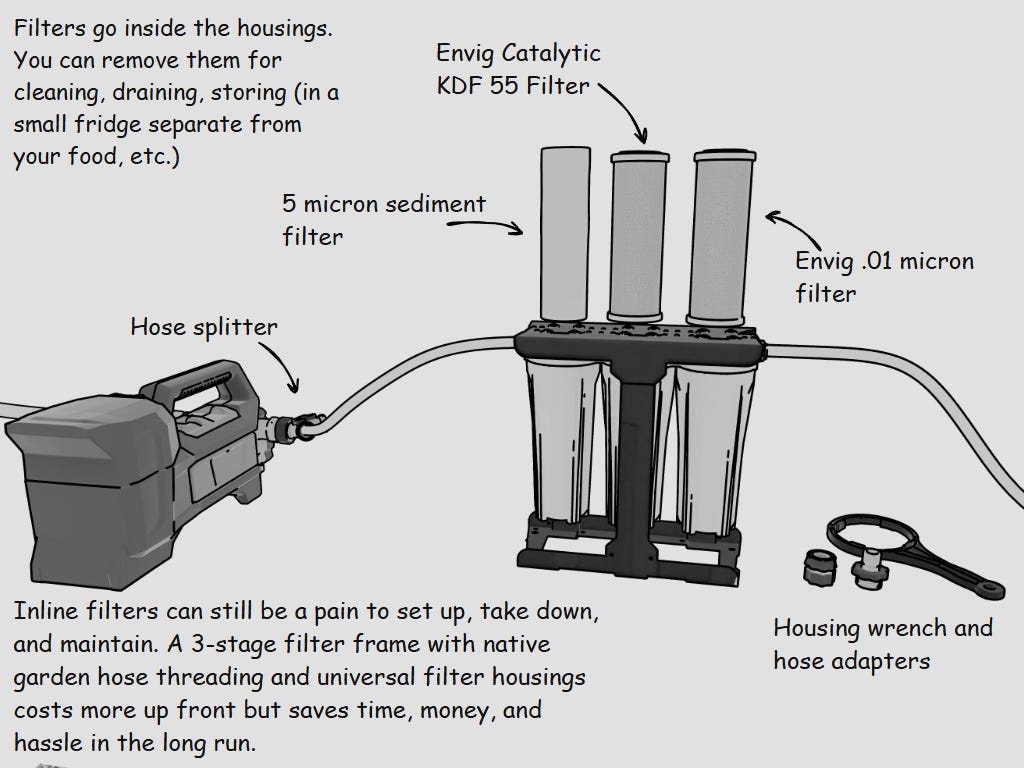
If you’re setting up your filters and taking them down every few days, that can turn into a real chore. We learned that firsthand. You can avoid a lot of the headache by using a 3-stage RV filter frame with universal housings.
Benefits: It’s a lot faster to set up and take down. You can replace the original filters with any 10 x 2.5 inch filters from any brand. That’s a good thing, because it means you can experiment a little with different filtration options. For example, we found something even better than the Sawyer Tap, which has a tendency to slide off under intense pressure. In the fourth setup, we’re using a .01 micron filter from Envig. That’s ultrafiltration, baby. It catches bacteria, cysts, parasites, and fine particles. It’s a powerful addon to KDF 55 carbon.
Like the other components, these come with native garden hose threads (just to keep things simple). We got ours from iSpring, the CW31. We also got a carrying case from Clearsource, but it’s not completely necessary. The RV filter system is compact, but it’s just heavy enough (16 pounds dry) that you might want to think about a way to make lugging it around a little easier.
Once we’re done with our inline filters, we’re probably moving to this streamlined setup to make everything more manageable.
We tried it, and…
We like it.
Quick tip: storing the filters
When you’re not using your filters, store them in a fridge to control bacterial growth. It’s best to use a separate mini fridge. It might sound like a hassle, but it’s worth it to protect the filters.
The final stage: gravity filtration & HOCl
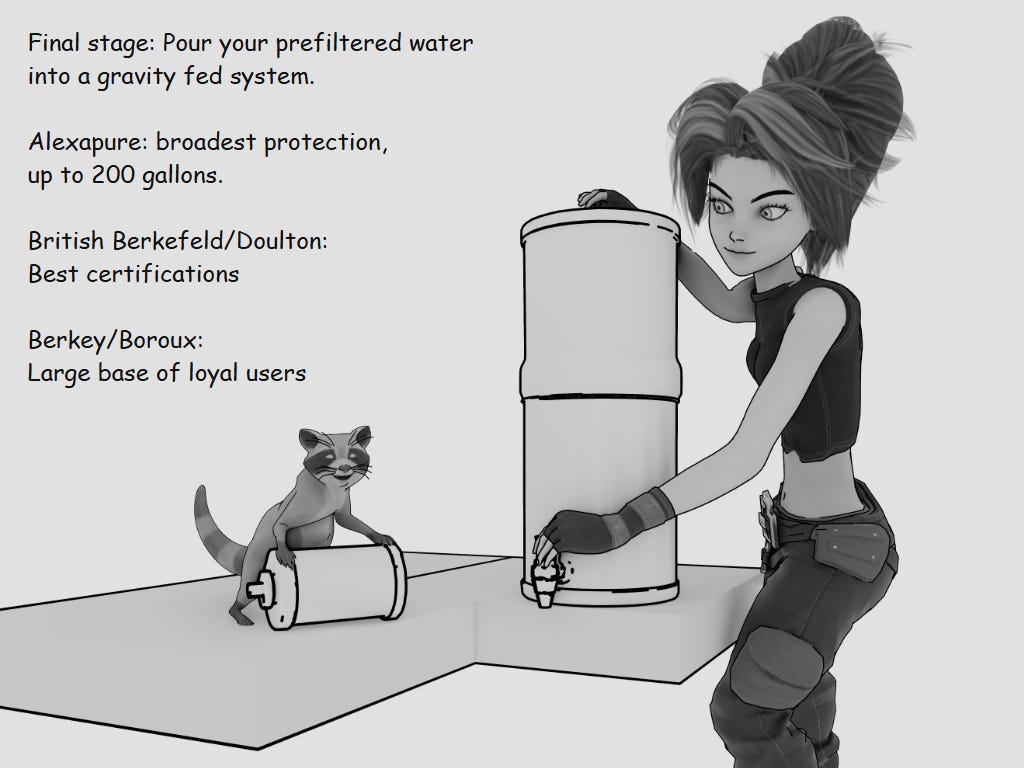
The first set of filters removes heavy metals and VOCs, along with sediment. They don’t remove viruses, bacteria, parasites, etc. The Sawyer Tap .1 micron filter can’t get the viruses, even though it stops the rest. Even the Envig .01 micron filter doesn’t stop all viruses. So we needed a final stage.
That’s where the gravity-fed systems come in. We spent a long time untangling all the claims and ad copy to find out which gravity filters actually do what they say. We looked at several different brands.
Ultimately, we went with Alexapure.
There was one last problem we had to deal with: Our filtered water kept triggering home bacteria tests. We finally figured out why. Basically, unchlorinated water will almost always trip a bacteria test. We didn’t want to just shrug it off. That’s what a hobbyist prepper would do.
So, we added a HOCl treatment. If you’re not familiar, HOCl is a powerful disinfectant that your own body makes to fight pathogens. I’ve written about it before. It has an established reputation in food safety. Hypochlorous acid (HOCl) is a free chlorine that’s already used to treat water during emergencies. We scoured various state health departments and university pages to arrive at this: You can shock-treat water with HOCL at 100-200 ppm to ensure that you’re killing any viruses or bacteria that made it through the filtration process.
So, we added 1/4 - 1/3 cup of HOCl (200 ppm) to every 1 gallon of water to kill any remaining viruses or bacteria. The lower dose (1/4 cup) takes us to roughly 3 ppm of free chlorine, considered safe for drinking. The higher dose (1/3 cup) takes us to roughly 4.08 ppm, just barely over the 4 ppm threshold. So if we stay within that range, we’ll maximize pathogen killing and stay in the safe zone.
People have asked us which type of HOCl generator we use. We’ve been using the Eco One for about a year, with test strips. It works.
You probably don’t want to add HOCl to your gravity-fed system, because it’s corrosive over time. So, we added a second container. We’re using a 2-gallon sports cooler. Just open your gravity spigot and pour it right in. We keep the cooler next to our Alexapure. We fill the cooler.
Then we add the HOCl.
The lab test results
We sent a sample of our filtered rainwater to a lab for testing. We used Tap Score’s “advanced rainwater test,” which looks for more than 100 different toxins including heavy metals, VOCs, and bacteria.
And drumroll…
It’s clean.
No VOCs. No heavy metals. No bacteria. Everything falls right in line with the EPA’s federal MCLG (maximum contaminant level goal). It’s a strict, unenforceable guideline that many municipalities strive for. So, our water might even be cleaner than what comes out of many taps.
Take a look:

Our conclusion:
This plan works. We like it. We’re not going to drink this water every day, but we have a system ready to deploy for longterm disasters.
The entire setup costs about $1,000. Once you’ve set it up, you’ll spend a few hundred bucks a year to replace all the filters if you’re using them continuously. You could save money if you only use them for emergencies.
If you’re only using them for emergencies, you have to follow the instructions that come with the filters for safely storing them.
All told, it’s a fraction of what a full system would cost if you installed a metal roof and hired professionals. If we wanted to install a metal roof with a cistern and a pro filtration system, connected to our plumbing, that would easily run $30,000 - $50,000 to get the whole thing in place.
One can dream…
But that’s the whole point. We don’t have time to daydream about our perfect survival setup. We can’t just sit in envy of Australians, where they’ve normalized rain collection. We have to do the best we can where we are.
If you can’t afford this on a single budget, consider crowdsourcing it. A small group could share pumps and filters.
I’ve done my best to list all the specific parts and brands we used for the project. I’ve started keeping detailed lists of parts and supplies for all of our survival projects on this site. All of this information is free. I’m not doing this for commissions. We don’t use affiliate links. We’re not making any money off the sales. People have just asked for me to be as specific as possible, and I’m honoring that.
Do whatever you want with it.
It would be great if we could start normalizing rain harvesting. Maybe one day, we’ll be more like Australia. This is where it starts.
Wells can run dry. Reservoirs take a long time to recharge. After fifteen minutes of rain, we have 100+ gallons of water. We’ve had water during one of the worst droughts in our community’s history.
It sounds like a lot of work, and it sounds expensive. Well, it’s all relative, and it all depends on how badly you want to live. If you don’t want to do any of this, feel free to place your faith in the hands of the billionaire ventriloquists at Davos. Celebrate the “year of water.” I’m sure they’ve got your back.
We decided to try something else.
It worked.
Thank you, Jessica. You have done a great public service. It must be satisfying to be largely at the end of the project.
I admire your spending such time and energy setting up these contraptions and then teaching readers in such detail how to set them up themselves, without sacrificing your sense of reality about what might happen if the water supply does become apocalyptically low.
I’d be interested to hear your take on prepping for those who live in mid to large cities where apartment buildings are the norm instead of houses and where most people live (that’s not at all to imply that suburban prepping is of limited usefulness). It’s daunting, to say the least, for us urbanians.